We have finally integrated the blog with our main website! All new blog posts (and all of the old ones, too) will be found at the following location:
www.LightWorkshops.com/blog/
Hope to see you there. Just posted a demo video on the new Topaz Clarity.
Fiat Lux!

Wednesday, May 22, 2013
Wednesday, April 24, 2013
The $5 Photo Accessory (that could save your life)

As nature, landscape, and wildlife photographers we often place ourselves in locations and situations that are a bit off the beaten path. When we do go out to make photographs it is worth thinking a little about possible contingencies and how we will handle them should something occur. As the most basic precaution, I consider one of the least expensive pieces of gear a photography essential, the simple whistle.
In our modern society, we tend to take our safety or our ability to rapidly communicate for granted. Sometimes that is the case. For example, if you are out with me you know you are with an instructor who is certified in CPR and first aid, has had extensive survival training, and handles high stress situations well. More often though, most photographers think if they have their cell phone they are ready and help is just a call away. But it is amazing how often we find little to no cell coverage, a dead battery, or a situation where the phone is just out of reach.
As a pilot, I learned to plan for contingencies and to prioritize redundancy in safety or communication systems. To back up your phone one of the simplest preparations you can make is to carry a whistle when you go out to make photographs. Survival situation after survival situation has proven that a whistle is a "must have" piece of gear. Look at any list of items you should have in the field or wilderness and a whistle will be on it. Oh by the way, it is not enough to have the whistle with you, have it on your person and easily accessible with either hand.
Photographers in the field are just like hikers, campers, and other outdoor enthusiasts. Interestingly, they tend not to think of themselves as such because our hobby, passion, or profession is so dependent on high tech gear. But in most cases there is no difference. As an example, Hal has a friend in Alaska who recently almost lost his life while out in the wild. Overcoming incredible odds he was rescued and recovered, but only because of his whistle. He was in a bad position and the only way he could try and find help was to blow his whistle. He blew for over an hour and finally someone heard and investigated. They joked afterwards that his whistle was the $2 accessory that saved his life. Pretty amazing considering the guy had thousands of dollars of other gear with him. It is also worth mentioning that Hal's friend broke one of the cardinal rules, he went out alone without using the buddy system (the topic of another post.)
So when you are packing up the camera, lenses, and tripod, make sure to put a simple whistle in your pocket. If you ever run across him in the field, ask Hal to see the four essential pieces of shooting gear: Hoodman HoodLoupe, cell phone for DOF calculations/comms, a good knife, and a whistle.
Always remember making the photograph is optional but making it home is mandatory. (Paraphrased from my mountaineering buddies.)
Fiat Lux!
Tuesday, April 16, 2013
Lightroom 5 Beta Features - Hal's Favorites
The three part video demonstrates and discusses my favorite features of the Lightroom 5 beta. The full feature list is below but my favorites are: Improved spot removal and retouching, the Radial Filter, improved crop overlay, import functionality, Smart Previews, and Upright for auto lens corrections.
In the video I reference additional keyboard shortcuts for the Spot Removal and Radial Filter tools. The shortcuts are shown below.
Spot Removal (Q)
-New circle spot (auto-find source): Single click
-New circle spot (user-defined source): Ctrl drag
-New circle spot (scale from center): Ctrl Alt drag
-New circle spot (scale from anchor): Ctrl Shift drag
-Connect two circle spots: Single click + Shift click
-Increase circle spot size: ]
-Decrease circle spot size: [
-New brush spot: Click drag
-Constrain brush spot to straight line: Shift drag
-Cycle Spot Type: Shift + Q
-Auto-Find New Source: /
-Visualize Spots: A
-Hide Spot Overlays: H
-Delete spot: Alt select
-Delete selected spot: Delete
-Delete multiple spots: Alt drag select
Radial Filter (Shift + M)
-New elliptical mask: Drag
-Apply new mask to crop bounds: Ctrl double-click
-Expand existing mask to crop bounds: Ctrl double-click on mask
-Duplicate: Ctrl Alt drag
-Invert elliptical mask: ’ (apostrophe)
-Hide/show guide: H (short press)
-Hide guide on press, show on release: H (long press)
-Apply & dismiss: Double-click on photo
-Delete selected elliptical mask: Delete
Major feature list
-Smart Previews
-PNGs now supported in Lightroom
-New fullscreen mode. F key is true full screen. Legacy full screen mode is Shift + F
-Configurable grid overlays for Loupe view
-New searchable criteria for Smart Collections - File size, Image size, Image bit depth, color channels, Color mode, Color profile, Smart Preview statsus, and PNG
-Advanced healing brush for Spot Removal
-Radial Filter
-Upright auto lens corrections
-LAB color readout on histogram. Right click on the histogram for a flyout menu.
-New book features
I will do additional videos to show some of these upgrade features.
Fiat Lux!
Wednesday, March 20, 2013
Computer Specs
One of the most common questions we field concerns computer technical specifications. People often ask how they should equip and configure their next machine for digital photography purposes (often phrased as Photoshop or Lightroom purposes.) So let's talk computers for one little post.

LIGHT recommends the current specs as an excellent configuration. Off the side I will add comments and fall back positions.
Processor - Core i7 quad core. We are currently using the Core i7 3770 at 3.4 GHz. Although the two programs listed above perform best with a fast processor a good fall back position is found in the Core i5 3xxx options. We could go on a bit further regarding hyper threading or adding additional physical cores but we have not seen a huge requirement in typical digital photography needs. If you push a bit beyond the ordinary with your work, take these into consideration.
Memory - 16 GB. Most baseline systems these days are equipped with 8 GB of RAM but 16 will give you a nice performance boost. There normally is no need to get the fastest clock speed RAM available unless you are also going to play games. On the lower side, go with 12 and on the upper top out at 32.
Graphics - Dedicated video card. There are a huge number of options here but start with an nVidia or ATI set with at least 1 GB. You may be tempted to go with the higher end cards but you will not see a huge benefit unless you are working with video or gaming. If you are thinking of running two or more high resolution displays you may want to upgrade as well. With all that said, the integrated graphics on the Core i5 and i7 (from 2500-4000) are pretty good. You might be surprised how well they work. The nice thing is you can always add a dedicated video card later if you need to.
SSD - Solid state drive for programs and speed critical data. SSD prices have dropped significantly and the performance boost is really nice. An SSD is not a must have but a majority of our clients enjoy the faster start up times and fast program launches. At a minimum go with a 128ish GB drive. You can go bigger (my laptop has a 512 GB SSD) but the drives will be a bit pricier.
Hard drives - At least two, one for data and one for scratch/working space. Hard drive prices have come back down so we like at least 1 TB for storage and 320-500 GB for scratch. Try for the 7200 rpm drives and if you want faster there are 10k and 15k rpm available.
Ports - USB 3.0 and Thunderbolt. Odds are you will connect external storage to your machine and you want it to be fast. At the top of the list is the Thunderbolt connection, huge speed and flexibility but not as many peripheral/storage choices and much more expensive. Not nearly as fast but almost ubiquitous and priced right, the USB 3.0 connection is a necessity. Definitely think about these options as one of the most frustrating things is waiting for your machine to communicate with external storage (Lightroom users especially.)
Fortunately, these specs are not too far out of reach for most folks. Although you may pay a bit more for the system, configuring it properly will save you big in time and workflow efficiency.

For the somewhat adventurous, LIGHT recommends building your own system. I recently built the computer shown in the pictures above for about $1275 and two hours of my time. It has all of the options listed above and is unbelievably fast. For those who may be thinking Thunderbolt and Windows? My machine is Windows and has two Thunderbolt ports along with eight USB 3.0 and a handful of USB 2.0. Depending upon how and when you source your parts the do it yourself option can save you quite a bit. More importantly, the process forces you to learn about the options and make smart choices as to what is best for your needs and workflow.
Any questions, comments, concerns, or addtions add a comment or email me at hal@lightworkshops.com.
Fiat Lux!
Recent build in the LIGHT studio.
Processor - Core i7 quad core. We are currently using the Core i7 3770 at 3.4 GHz. Although the two programs listed above perform best with a fast processor a good fall back position is found in the Core i5 3xxx options. We could go on a bit further regarding hyper threading or adding additional physical cores but we have not seen a huge requirement in typical digital photography needs. If you push a bit beyond the ordinary with your work, take these into consideration.
Memory - 16 GB. Most baseline systems these days are equipped with 8 GB of RAM but 16 will give you a nice performance boost. There normally is no need to get the fastest clock speed RAM available unless you are also going to play games. On the lower side, go with 12 and on the upper top out at 32.
Graphics - Dedicated video card. There are a huge number of options here but start with an nVidia or ATI set with at least 1 GB. You may be tempted to go with the higher end cards but you will not see a huge benefit unless you are working with video or gaming. If you are thinking of running two or more high resolution displays you may want to upgrade as well. With all that said, the integrated graphics on the Core i5 and i7 (from 2500-4000) are pretty good. You might be surprised how well they work. The nice thing is you can always add a dedicated video card later if you need to.
SSD - Solid state drive for programs and speed critical data. SSD prices have dropped significantly and the performance boost is really nice. An SSD is not a must have but a majority of our clients enjoy the faster start up times and fast program launches. At a minimum go with a 128ish GB drive. You can go bigger (my laptop has a 512 GB SSD) but the drives will be a bit pricier.
Hard drives - At least two, one for data and one for scratch/working space. Hard drive prices have come back down so we like at least 1 TB for storage and 320-500 GB for scratch. Try for the 7200 rpm drives and if you want faster there are 10k and 15k rpm available.
Ports - USB 3.0 and Thunderbolt. Odds are you will connect external storage to your machine and you want it to be fast. At the top of the list is the Thunderbolt connection, huge speed and flexibility but not as many peripheral/storage choices and much more expensive. Not nearly as fast but almost ubiquitous and priced right, the USB 3.0 connection is a necessity. Definitely think about these options as one of the most frustrating things is waiting for your machine to communicate with external storage (Lightroom users especially.)
Fortunately, these specs are not too far out of reach for most folks. Although you may pay a bit more for the system, configuring it properly will save you big in time and workflow efficiency.
Pure fun building this little beast of a Photoshop machine.
Any questions, comments, concerns, or addtions add a comment or email me at hal@lightworkshops.com.
Fiat Lux!
Monday, February 4, 2013
Add Two Steps
Recently, we have seen an increase in photographers using the High Pass filter in Photoshop to add edge contrast and texture detail to their images. This is a cool technique but when you use the filter remember to add two more steps; desaturate your layer before applying the High Pass filter and always target your filter effects with a mask.
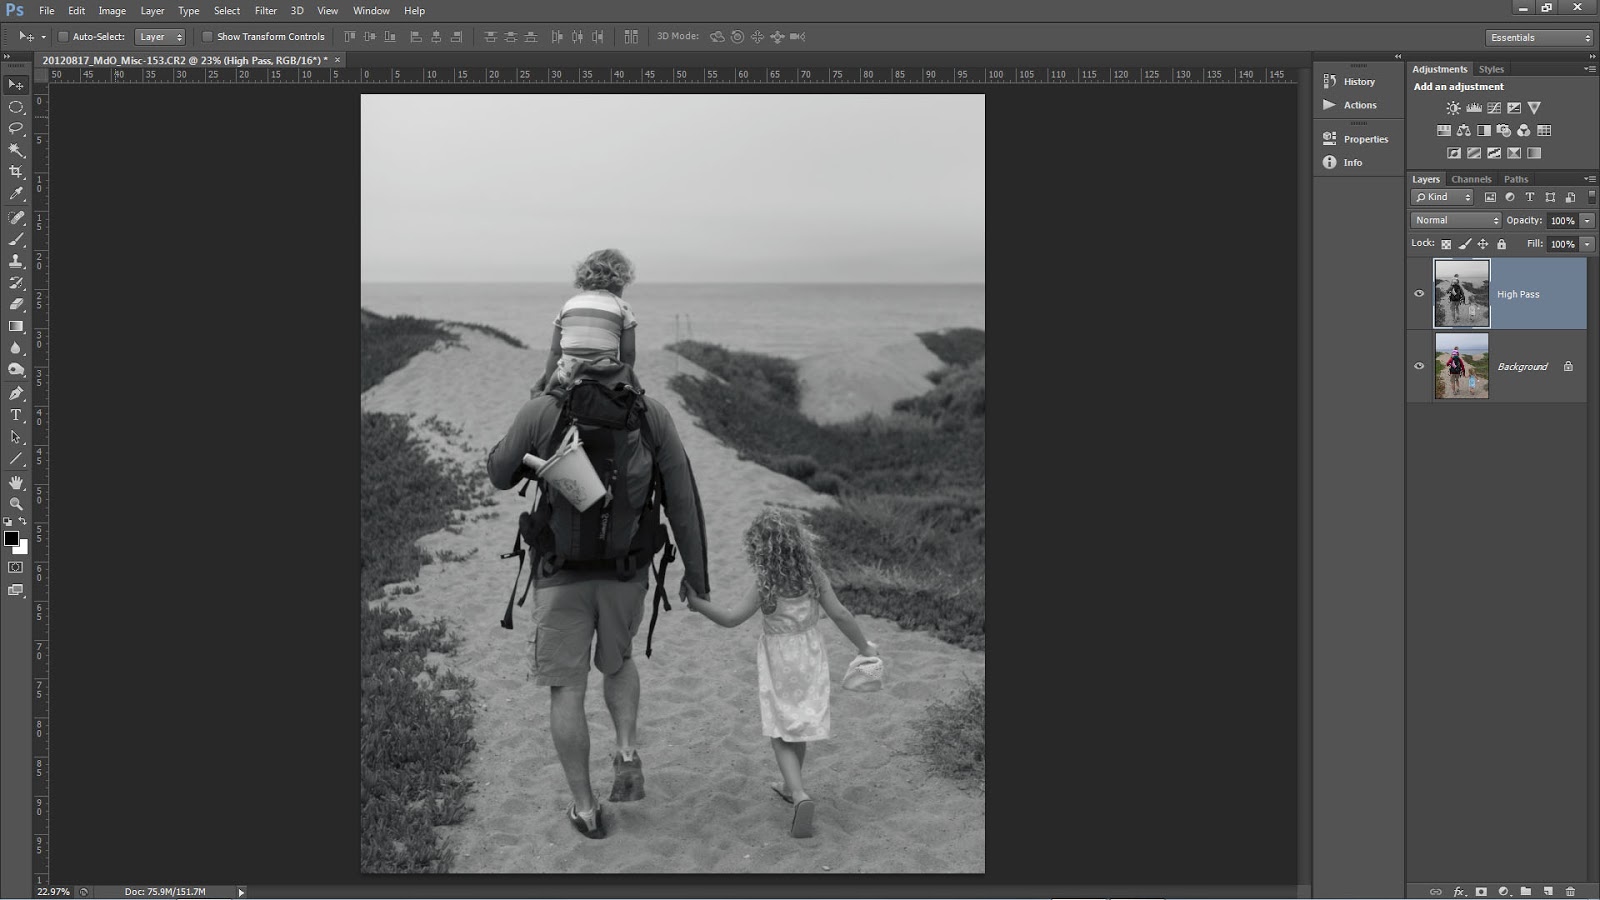
You may have seen or heard many photographers talking about how they sharpen only on the Lightness channel in L*A*B* or they make sure to change the blend mode of their sharpening layers to Luminosity or they use the Fade option with a Luminosity blend mode change. There are many good reasons to make these switches and we suggest you use them in your sharpening or contrast boost workflow. For the same reasons, when you use High Pass desaturate.
It is a common misconception that when you run the High Pass filter you are left with an image that is baseline 50% gray and only shows brighter or darker tonality at the edge contrast and texture detail. Instead, High Pass may retain color information from the original image. This can lead to color shifts or colored fringe along a high contrast edge similar to haloing.
 Our workflow is to copy the background layer or stamp visible if you have a multi-layer document and then desaturate via Image>Adjustments>Desaturate this can also be executed with the keyboard shortcut of CTRL+Shift+U for Windows or CMD+Shift+U for Mac.

For those who want to play or have more control you can

Fiat Lux!
It is a common misconception that when you run the High Pass filter you are left with an image that is baseline 50% gray and only shows brighter or darker tonality at the edge contrast and texture detail. Instead, High Pass may retain color information from the original image. This can lead to color shifts or colored fringe along a high contrast edge similar to haloing.
Notice the remaining color.
- Run a Black and White adjustment instead and modify the tonality of the color arcs.
- Use multiple layers of High Pass set to different radii.
- Leave the color in your layer in order to generate a color boost. Watch out for fringing!
- Use the filter on a Smart Object so you can make changes.
- Invert your filter layer to decrease contrast and texture detail.
- The sky especially blue sky.
- Areas of constant color or tone.
- Flowing water.
- Out of focus areas.
- Human skin especially female skin.
Wednesday, January 16, 2013
2013 Metadata Presets Update
I am certain you have already done this but just in case you have not make sure to go in and modify your metadata presets. This is also a great time to verify you made a new parent folder reflecting the new year.
In the quick video Hal shows the update process for Lightroom and the Bridge.
Annual Metadata Preset Update (2013 Version) from Hal Schmitt on Vimeo.
In the quick video Hal shows the update process for Lightroom and the Bridge.
Annual Metadata Preset Update (2013 Version) from Hal Schmitt on Vimeo.
Tuesday, January 15, 2013
LR Videos Streaming Free
If you have not seen this announced yet, Elephorm is streaming Hal's Lightroom training videos free until the 31st of January.
We are biased but there is no better Lightroom training available and FREE for the next two weeks makes it even better.
Elephorm Lightroom
Have fun and Fiat Lux!
We are biased but there is no better Lightroom training available and FREE for the next two weeks makes it even better.
Elephorm Lightroom
Have fun and Fiat Lux!
Subscribe to:
Posts (Atom)